

Last updated: September 25, 2026
Managing storage is a constant challenge for SharePoint Online administrators. One often-overlooked culprit in site storage consumption is the recycle bin in SharePoint Online. SharePoint uses a two-stage recycle bin (first-stage and second-stage) to ensure that accidentally deleted content can be recovered. But this safety net can significantly affect storage usage at both the site and tenant levels. In this article, we’ll explain how the two recycle bin stages work, what admins and users can (and can not) do in each stage, how they impact storage quotas, and how to manage them (including PowerShell scripts with examples). This article provides an immediate but short-term solution for you, if your tenant hits the SharePoint Storage limit. We’ll conclude with why a solution like ShArc can be invaluable in keeping your SharePoint storage under control.
The two-stage recycle bin in SharePoint Online and how it works
SharePoint Online employs a two-stage recycle bin system to handle deleted content:
-
First-Stage recycle bin (site recycle bin): the initial location for deleted items at the site level.
-
Second-stage recycle bin (site collection recycle bin): a secondary container accessible by admins, for items removed from the first-stage or certain special deletions.
|
Recycle bin retention 93 days Deleted items remain recoverable for up to 93 days in SharePoint Online (retention period is fixed). |
Second-stage capacity 200% of site quota Storage allocation for second stage (site collection) recycle bin, in addition to the site's own quota (not configurable in SharePoint Online). |
Understanding the lifecycle of a deleted item is crucial. When a user deletes a file, list item, document library, or even an entire subsite, it doesn’t immediately vanish. Instead, it enters one of these recycle bins:
-
If a user deletes an item (file, folder, list, etc.): it goes into the site’s recycle bin (first-stage). The user (and site owners) can see it there and have the opportunity to restore it or further delete it.
- If an item is deleted from the first-stage recycle bin (i.e. the user or site owner empties it or deletes that entry): it moves into the second-stage recycle bin (site collection level).
- If a subsite (classic subsite within a site collection) or an entire site is deleted: it bypasses the first stage and goes directly to the second-stage recycle bin. (In SharePoint Online’s modern architecture, deleting an entire site collection is handled via the admin center “Deleted Sites,” but conceptually it’s similar: a soft-delete that an admin can undo.)
Each deleted item is tagged with a retention period of 93 days from the time of its original deletion. Importantly, this 93-day countdown does not reset or extend when an item moves between recycle bins. That means an item will be permanently removed 93 days after you first delete it, regardless of whether it’s in the first or second stage at the time. The only exceptions are if an admin manually deletes it sooner, or if Microsoft’s system purges it due to storage limits (more on that shortly).
First stage recycle bin in SharePoint Online (site level)
The first-stage recycle bin is the one end users interact with on the SharePoint site. It’s often just called “Recycle Bin” in the site interface. Here’s how it works and what to know:
-
Visibility & Access: Regular site members can view and manage their own deleted items in the first-stage recycle bin. For example, if John deletes a document, John can go to the site’s Recycle Bin and see that document listed. Site collection administrators (and in many cases site owners with full control) can see and restore all items deleted by any user on that site, whereas a user without admin rights typically only sees content they deleted themselves.
-
Retention: Items stay here for up to 93 days from the deletion date (unless removed earlier). If nothing else happens, the item will sit in the first-stage bin for the entire retention period. After 93 days, it will be purged from SharePoint entirely (unless it was moved to second-stage earlier; in that case, it might already be gone from first-stage).
-
User Capabilities: End users or site owners can restore items from the first-stage recycle bin back to their original location. This is the primary purpose: to easily undo deletions. Users can also permanently delete items from the recycle bin, which actually means moving them to the second-stage (they’ll get a prompt warning they are about to permanently delete; to the end user it appears final).
-
Storage Impact: Critically, content in the first-stage recycle bin still counts against the site’s storage quota. SharePoint treats these like “soft deleted” items that remain in the site’s database. If a site has a lot of data sitting in the recycle bin, it can consume the site’s allocated storage and potentially lead to quota issues. For example, if a site has a 100 GB quota and users deleted 20 GB of files (which are now in the recycle bin), the site is effectively using that 20 GB plus whatever is in active use. In fact, as long as those 20 GB remain in the first-stage bin, the site’s used storage will include them. This can catch administrators off guard. You might have expected free space after deleting files, but SharePoint doesn’t free that space until the recycle bin is emptied or the retention period expires.
Note: The first-stage recycle bin’s contents obey the standard list/library item limits, like the list view threshold. In extreme cases (thousands of items), viewing or emptying the recycle bin via the web UI can be slow or hit thresholds; this is where PowerShell techniques (discussed later) help.
Second-stage recycle bin (site collection level)
The second-stage recycle bin is the safety net between the first stage and a recovery from backup. It is sometimes called the “Site Collection Recycle Bin” or “Admin Recycle Bin.” Items end up here after they leave the first stage (or when certain items like subsites are deleted). Key facts about the second-stage bin:
- Visibility & Access: Only site collection administrators can see and manage the second-stage recycle bin. End users do not have access to it. To reach it, an admin typically goes to Site Settings → Recycle Bin (which first shows the first-stage items), then clicks “Second-stage recycle bin” at the bottom of that page. This opens the view of all items that have been deleted from the first stage (and any deleted subsites or site collections).
- Contents: The second-stage contains any item that was deleted from the first-stage bin. In practice, that means if a user or site owner deletes an item again from the Recycle Bin, it appears here. Additionally, if a subsite is deleted, it goes here directly. Think of the second-stage as a central holding area for all “almost gone” content in that site (or site collection). Items in the second-stage are still recoverable. An admin can restore them to their original location, just like from the first stage.
- Retention: Items do not get a new retention period here; they carry over whatever time remains of the original 93 days. If an item spent 10 days in the first stage before being deleted from there, it will have 83 more days in second-stage before SharePoint permanently deletes it. If the total 93 days since initial deletion passes, the item is gone from the second-stage as well. In other words, first and second stage together provide up to 93 days of recoverability. NOT 93 days each.
- Storage Impact & Quota: A big difference: the second-stage recycle bin does not count against the site’s storage quota. This means that when an item moves to second-stage, the site’s “used storage” metric goes down (since the first-stage entry was removed). However, that data still physically exists in your tenant’s storage. Microsoft provides a separate bucket of space for the second-stage recycle bin, equal to 200% of the site’s quota. For example, if your site has a 100 GB quota, the second-stage recycle bin can hold up to 200 GB of content. This generous buffer ensures that even if users delete a massive amount of data, they can still potentially recover it without immediately forcing the site offline for exceeding quota. However, the data in the second-stage recycle bin does still consume storage from the overall tenant pool (it’s not free storage; it just doesn’t apply to that site’s limit).
- Automatic Purge on Overflow: The second-stage recycle bin’s 200% capacity is not unlimited. If that capacity is exceeded (say users delete so much that the second-stage would exceed 200% of site quota), SharePoint will automatically start purging the oldest items in the second-stage to make room. In effect, the least recently deleted items get permanently erased to keep the recycle bin within the 200% allocation. This purge respects the retention as much as possible (it won’t delete items newer than older ones until absolutely needed).
- Admin Capabilities: Site collection admins can restore items from the second-stage back to their site (just like restoring from first-stage). They can also delete items from the second-stage to permanently remove them. If an admin clicks “Empty second-stage Recycle Bin,” all items in it are permanently deleted, freeing that storage immediately. Typically, an admin might do this to reclaim space at the tenant level or to remove clutter after confirming the content is no longer needed.
The table below summarizes the key differences between the first-stage and second-stage recycle bins in SharePoint Online:
| Aspect | First-stage recycle bin (site level) | Second-stage recycle bin (site collection level) |
| Who can access? | Siteusers (for their own deleted items); site owners (limited) | Site collection administrators only (not visible to ordinary end users) |
| How items get here | Items deleted from lists, libraries, pages, or Teams channels on the site | Items deleted from the first-stage recycle bin; entire subsites or site collections deleted |
| Retention period | Upto 93 days from deletion (item stays here unless user empties it) | Remainder of the 93-day period (no reset upon entering second stage) |
| Storagequota impact | Countsagainst the site’s storage quota (occupies site storage until removed) | Does not count against the site’s quota (uses separate storage up to 200% of site quota) |
| Accessibleby end-users? | Yes,users can view their own deleted items, restore them, or delete them (sendingto second stage) | No, end-users cannot access second-stage. Only admins see this bin |
| Actions available | Restore item to original location, Delete item (moves it to second-stage) | Restore item to original location, Delete (permanently remove from SharePoint) |
| Automatic cleanup | None (items remain until manually deleted or retention time expires). | Oldest items purged automatically if second-stage exceeds its storage capacity (200% quota) |
Note: In modern SharePoint Online, when an entire site (site collection) is deleted, it appears under the SharePoint admin center’s “Deleted Sites” section, where a SharePoint admin can restore it within 93 days. This is conceptually similar to the second-stage recycle bin at the tenant level. (For classic subsites, as mentioned, they show up in the parent site’s second-stage recycle bin.)
Effects on storage: site quotas and tenant storage
Understanding recycle bins has practical consequences for managing storage:
-
Site-Level Quota: As highlighted, the first-stage recycle bin directly affects the site’s storage quota. If your site has a maximum storage limit (e.g. in a manual site storage management scenario or just the pooled limit per site display), the recycle bin content can push you to that limit. If a site’s storage quota is exceeded (due to recycle bin content or otherwise), SharePoint will enforce read-only mode for the site – users might be unable to add new content until space is freed. This is why regularly emptying the first-stage recycle bin is a recommended practice to reclaim space. You don’t want to be in a situation where your site becomes read-only just because a lot of stuff is sitting in the recycle bin.
-
Tenant Storage Pool: In SharePoint Online, all site content (across all sites) draws from a tenant-wide storage pool (your total SharePoint storage allowance). Deleted content in either stage of the recycle bin is still stored in the SharePoint environment, so it counts against that overall pool. The twist is that first-stage content is counted in the site’s reported usage, whereas second-stage content is “hidden” from site usage. But at the tenant level, both stages consume space. If you have many sites with large second-stage recycle bins, you may see your tenant storage usage bar climbing even though individual site reports don’t show where that data is – it’s in the second-stage bins. In short, deleted items aren’t truly free space until they’re permanently gone. This means from a tenant admin perspective, monitoring recycle bin usage can be important: you might pay for extra SharePoint storage or hit pooled limits because of data retainers in recycle bins.
-
No Configurable Settings in SPO: On SharePoint Server (on-premises), farm admins could adjust recycle bin settings. For example, change the retention duration or the second-stage bin size (often defaulted to 50% of site quota on-prem). However, in SharePoint Online these settings are fixed by Microsoft. The 93-day retention and 200% second-stage allocation cannot be changed in SharePoint Online. There is also no option to disable the recycle bin or skip it. It’s always on as a safeguard. The only “settings” lever you have is indirectly through retention policies (which, if you implement a retention label/policy that permanently deletes content after X days, might bypass the recycle bin by deleting content after that period).
-
Retention Policies and Legal Holds (Advanced): If your organization uses Microsoft 365 Retention Policies or has content on eDiscovery hold, note that those can affect deletion. For example, if a retention policy says “keep data for 7 years,” when a user deletes a file, it will still go to the recycle bin for 93 days for user recovery, but behind the scenes a copy is kept in the Preservation Hold Library (PHL) until the retention period passes. The presence of a retention hold means that even after 93 days, the item might still be consuming storage in the hidden PHL. Admins should be aware that emptying the recycle bin won’t free space for items under retention hold – they’ll only be freed when the hold duration ends or the item is removed from the hold. This is a complex topic on its own, but it’s worth mentioning because compliance settings can override normal recycle bin cleanup.
Managing and emptying recycle bins
For SharePoint administrators, it’s important to know how to empty recycle bins to free up space (especially in emergency “site is out of space” scenarios or regular maintenance). There are a few ways to clean up recycle bins:
-
Manual (Web Interface): Site owners or users can empty the first-stage recycle bin by clicking “Empty recycle bin” on the Recycle Bin page in the site. Site collection admins can then click into the second-stage and similarly empty that. The UI approach is straightforward for one site:
1. Go to the SharePoint site → Site Contents → Recycle Bin.
2. In the first-stage Recycle Bin, use “Empty recycle bin” to delete all items (or select specific items and choose “Delete Selection”). This will send all those items to second-stage.
3. At the bottom of the Recycle Bin page, click “Second-stage recycle bin” (this link appears for site collection admins). On the second-stage page, click “Empty recycle bin” to permanently delete all items from the second-stage.
After doing this, the site’s used storage should drop noticeably, and those items are fully purged (no longer counting even against tenant storage, except any that might live in backups or PHL).
-
PowerShell (PnP or CSOM): Doing the above through the UI is fine for a one-off cleanup, but not practical if you need to do this for many sites or on a schedule. Fortunately, SharePoint’s APIs allow emptying recycle bins. You can use SharePoint Online Management Shell (which uses CSOM) or the more modern PnP PowerShell. Here we’ll show examples with PnP PowerShell, which is very convenient for admin tasks:
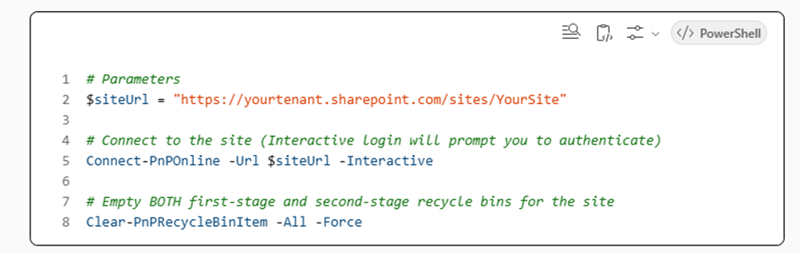
The Clear-PnPRecycleBinItem -All cmdlet permanently deletes all items from both stages of the recycle bin for the specified site. The -Force switch bypasses confirmation prompts. After running this, the site’s recycle bins will be completely empty.
PnP PowerShell also allows targeted emptying. For example:
-
Emptying Recycle Bins Tenant-Wide: If you find your tenant storage is reaching its limit and you suspect lots of sites have large recycle bins, you might decide to purge them in bulk. This can be done via a PowerShell script that enumerates all site collections. For example, using PnP PowerShell:
PowerShell
# Connect to the admin center
Connect-PnPOnline -Url "https://yourtenant-admin.sharepoint.com" -Interactive
# Get all site collections (excluding OneDrive personal sites for example)
$sites = Get-PnPTenantSite -IncludeOneDriveSites $false
foreach($site in $sites) {
Connect-PnPOnline -Url $site.Url -Interactive
Write-Host "Clearing recycle bins on site:" $site.Url
Clear-PnPRecycleBinItem -All -Force
}
This loop connects to each site and clears its recycle bins. Use such a script with caution! You’ll be permanently deleting possibly thousands of items across the environment. It’s wise to inform site owners or have a policy in place before doing a blanket wipe. In many cases, targeted cleanups or user education is preferable to a tenant-wide purge.
-
Monitoring Recycle Bin Size: Currently, SharePoint’s out-of-the-box reports don’t explicitly break down how much storage is consumed by the recycle bin per site. As an admin, you might need to script it (for example, using PnP’s Get-PnPRecycleBinItem to list items and sum their size). Third-party tools or scripts can help identify the biggest “trash” accumulators. This can help prioritize which sites’ bins to empty.
PowerShell vs. UI summary
| Task | Web UI method | PowerShell method |
| Empty first-stage bin (single site) | Site contents → Recycle Bin → “Empty recycle bin” (as site owner) |
Move-PnPRecycleBinItem (moves all to second-stage) (or use Clear-PnPRecycleBinItem -All to clear both at once). |
| Empty second-stage bin (single site) | Site Settings → Site Collection Admin → Recycle Bin → Second-stage → “Empty recycle bin” (as site collection admin) |
Clear-PnPRecycleBinItem -SecondStageOnly -Force |
| Empty both stages (single site) | No single-click UI for both; do first-stage then second-stage as above | Clear-PnPRecycleBinItem -All -Force (clears first and second in one go) |
| Empty recycle bins for all sites | Not feasible via UI (must repeat per site manually) |
Script with loop: e.g. use Get-PnPTenantSite and then Clear-PnPRecycleBinItem for each (see example above). |
| Restore an item | Select item in Recycle Bin → Restore (available in both first and second stage UIs) |
Not directly via SPO Management Shell; could use PnP (Restore-PnPRecycleBinItem) or CSOM if needed, but usually done via UI due to item identification. |
Having PowerShell scripts ready is extremely useful for admins. For instance, if a department offboards several employees and deletes a lot of content, you might quickly run a script to empty their site recycle bins and instantly reclaim storage rather than waiting for 93 days.
Conclusion: keeping SharePoint storage under control (why ShArc helps)
Mastering the recycle bin stages is essential for SharePoint Online admins. You now know that deleted items aren’t truly “gone” until you clear them or wait out the retention. Proactively managing both the first and second-stage recycle bins (through regular audits and scripted cleanups) helps maintain site quotas and avoids unpleasant surprises with storage limits. It’s a fundamental housekeeping task for SharePoint Online.
However, recycle bin management is just one piece of the broader storage puzzle. Organizations accumulate vast amounts of data in SharePoint – much of which might be old or infrequently used. Relying on manual deletion and recycle bins means you’re always reactive, and you might be forced to delete content permanently to free space. This is where ShArc comes in as a valuable solution.
ShArc is designed to help SharePoint admins optimize storage usage by archiving data to Azure Blob Storage while keeping it accessible in SharePoint:
-
Preventing Overstuffed Recycle Bins: Rather than waiting until a site is bursting at the seams and users delete content en masse (leading to huge recycle bins), ShArc enables you to identify and move less-used content out of SharePoint proactively. For example, documents that haven’t been touched in a year could be archived to cheaper Azure storage. This reduces the likelihood of sites hitting storage quotas and needing emergency bin purges. Essentially, fewer large deletions, fewer items clogging your recycle bins.
-
Direct Storage Savings: Content that is archived via ShArc no longer consumes your SharePoint Online storage pool (or counts towards site quotas), yet users can still access and restore it with one click if needed. This means you don’t have to delete content (and fill up the recycle bin) just to save space – you can relocate it. ShArc can cut SharePoint storage costs by 50% or more by utilizing Azure storage for archived data. This is far more cost-effective than buying additional SharePoint storage from Microsoft.
-
Automated Policies vs. Manual Deletion: Instead of relying on users or admins to periodically clean up, ShArc allows setting up automatic archiving rules (based on age, file type, location, size, metadata, etc.). This automation ensures your SharePoint sites stay lean. It complements the recycle bin: you’ll have fewer items being deleted in the first place because old content is seamlessly archived before someone decides to delete it.
-
Enhanced Data Lifecycle: While the SharePoint recycle bin gives you 93 days of safety, ShArc can be part of a longer data lifecycle strategy. Data that’s no longer active can be retained in a low-cost archive indefinitely (or as long as you decide), without cluttering up SharePoint. This way, you’re not racing against a 93-day clock for critical data that might be needed later. You can archive it but still get it back when required. In short, ShArc adds an “archive” stage to your content lifecycle, beyond the two recycle bin stages, providing both cost savings and peace of mind.
-
No Impact on User Experience: Importantly, using ShArc doesn’t confuse end users. They still work in SharePoint, OneDrive, Teams as usual; archived files can appear with shortcuts or be restored with a click, without IT having to dig into backups. This is analogous to how users restore from a recycle bin, but even more seamless – they might not even realize the file was archived to Azure.
In conclusion, SharePoint’s recycle bins are a vital tool for data recovery, but they require attentive management to avoid storage bloat. As an admin, you should regularly educate site owners about the 93-day retention, encourage periodic cleanup, and leverage PowerShell to empty recycle bins when needed. And to truly stay ahead of the storage curve, consider a solution like ShArc: it tackles the root cause of storage pressure by archiving unnecessary data before it becomes a recycle bin issue, saving you from crises and saving your organization significant costs. By combining good recycle bin practices with smart archiving, you ensure your SharePoint Online environment remains both cost-efficient and user-friendly.
To sum it up
Microsoft’s SharePoint storage add-on gives organizations flexible scalability, but it comes with a price: approximately 0.18€ per gigabyte per month for extra space beyond your included quota.
Understanding how storage accumulates and what it costs lets you make smarter decisions whether that’s cleaning up file sprawl, adjusting governance policies, or planning capacity and budgets more effectively.
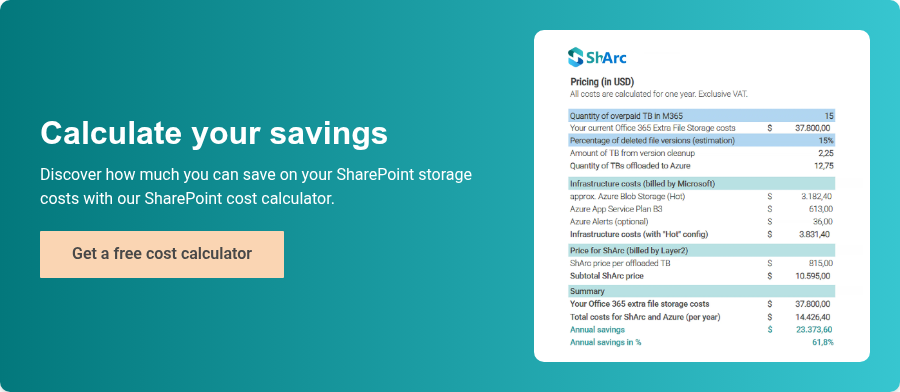
Try the SharePoint Cost Calculator now and see how much money you can save on SharePoint storage cost with archiving unused data.